Friday, June 11, 2010

A random challenge and graduation

Do you have times when you have projects you NEED to work on, (maybe a graduation card, a princess birthday card and an over the top thinking of you card and oh yeah an 8 x 8 wedding scrapbook) but you can't get motivated to work on ANY of them?  

How would you get motivated?  Me?  I do a "random" challenge.  I grab (or call) one of my kids and tell them (no I don't ask, I ORDER them) to pick one thing in the studio to use in a card. It can be anything, a stamp, an embellishment, a piece of paper, a color, a sticker, whatever catches their eye (or their imagination).   

Last weekend Erinn was the child I "ordered" to pick; she chose a recently acquired stamp (it was from the AWESOME sale at Stampers' Corner.)  A cute little fat bat stamp.


Sometime after I finished the challenge last weekend, I worked on the graduation card for our niece Elizabeth who is graduating from the University of  Oregon on Monday.  (I finished it this morning, just had to add the inside sentiment. It took lots of drying time to get the cap to stay on the duck's head.)   She has her first job lined up already. . .she is going to France to teach English for a year, hence the Eiffel Tower behind the birdcage. 


I am off to find (or make) an envelope for the duck.  (If you want details on either card, please let me know and I will be happy to share them.)

Have a great weekend!

Linda

Wednesday, June 9, 2010

Where does time go?

It seems like just a week or two ago I mentioned I was working on a new type of card (at least a new one for me).  It was actually over a month & half ago that I mentioned the new type of card.  Where does time go?

My first ever easel card was inspired by Tim Holtz' cards he created for the Hero Arts Blog Hop back in December 2009!   I created the background using the "smoosh" method (distress ink on the craft mat misted with water).   I used Hero Arts' "Dandelion Frame" with water misted distress ink.  Not sure who made the "happy birthday" stamps, no labels.  The metal butterfly is inked with alcohol ink. . . it was on clearance and intended for stepping stones and is  from JoAnn's, (the label is gone).


The second card was created using Hanko Designs quilting pattern, papers and charms!  The card base is core'dination paper.  It was really a fun card to make.  I love the quilting!   The sentiment stamp is Hero Arts' "Birthday and Always".


What new technique or style have you tried lately?

Have fun and play!
Linda

Sunday, June 6, 2010

Dreams!

The other night I had a dream, which according to experts is not unusual. It something that everyone does,  but usually once I wake up, if I a m lucky, I vaguely remember fragments of a dream but not much else.  Remembering the outcome of a dream several hours later is unheard of for me, but that's what happened.   

Before I show you the results of my dream, let me back-up a bit and give some background.  I bought Tim's "Caged Bird" die when it was first available and sent some die cuts to a couple of ladies who live overseas.  I did not send them all the "leftover" pieces (the pieces from between the bars of the cage).  I used a variety of paper, including grungeboard and grungepaper.  I had lots of them and I couldn't throw them away, I just knew I would use them "someday".

Then I had my dream.  I didn't even remember the dream until after I was up for a bit and went into my studio.  As soon as I sat down, it came back to me. . .well the end results came back to me at least.   This is what I was compelled to create:


The first is a card front using the "leftovers"  from the top cage as are the leaves, the stem is leftover from the bottom of the cage.  I am not sure if is completed yet, time will tell.  The second project is an ATC using leftovers from the bottom of the cage as a background.  All the leftovers are grungeboard, except for the stem which is grungepaper. All the ink is Distress Ink, except for the stamp which is Archival Jet Black. The stamp is from the "Visual Artistry - Flights of Fancy" set.  The spinners, washers, brads, jump rings and foliage are all from Tim's Idea-ology line.  The clock face is leftover from a project we did on the cruise; I think it is Heidi Swapp.   The gems and the heart lock are from my stash.

Sweet Dreams!
Linda
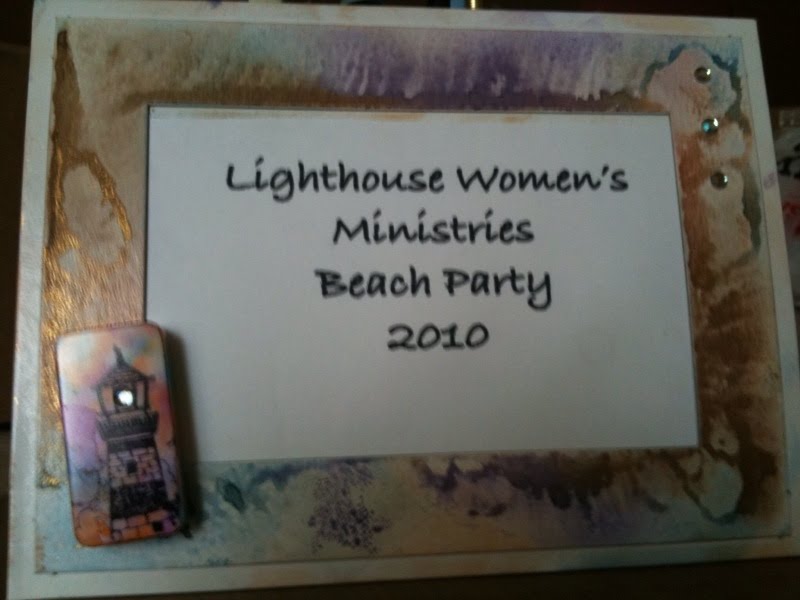
A few weeks ago Charlene told me about a project she was working on.   Her church is having a beach party today (June 6) and she was in charge of the favors.  She wanted the favors to be picture frames.  She had a good idea of what she wanted and could even "see" them, but wasn't quite sure how to get there.  To keep with the theme of the party she wanted something "beachy" but not tropical.  She wanted to use dominos with alcohol inks. She wanted to know if I would help.   Are you kiddin' me?  Of course I want to PLAY!  All that ink PLUS spending time with Charlene - that has the makings of a fantastic day!

Last Saturday (May 29)  morning Charlene brought over stacks of glossy finish photo frames (75 to be precise),  some dominos, some Perfect Pearls,and some distress ink ! She wanted a little sparkle on the frames.  We tried perfect pearls, straight - not enough color.  We tried perfect pearls with water and painted it on - more color, but still not enough.  We tried adding Distress ink with a blending tool, we tried alcohol ink, we tried lots of combinations.  (The backs of the frames also had the same glossy finish, so the experiments continued on the back.) 


We ended up using one of my favorite techniques. . .applying Distress Ink to a craft mat, spritzing with water (and perfect pearls) and smooshing!  (That's Charlene getting ready to smoosh!)  We ended up with 2 color combinations - one pastel, one bright.


For the dominos, we lined 78 (more or less)  dominos on two craft mats, inked up the inking tool - one with bright colors and the other with light colors.  We were done in about 5 minutes.  Then we inked up the lighthouse stamps (I think they are Stampin' Up) and stamped half the dominos with each stamp.  (That took us a little longer than 5 minutes, lol!)

A fantastic day it was, but  it was time for Charlene to go home and take all the pieces with her. We did more that just play  -  we took a field trip to Stampers' Corner, picked  up a birthday cake for her daughter, dropped off the cake at her house and went out to lunch.

Charlene assembled all the pieces by herself  (and with her permission) here they are, well two of them anyway:


Didn't she do a fabulous job?  I love the "light" in the light houses!

Friday, June 4, 2010

Have you heard?

Ranger Ink started a blog!  And they are on Facebook and Twitter too!  You can check out their blog here!  This is so exciting!  I found the link from Tim's site where he hinted they may have some random prizes, so while you are there, be sure to leave a comment.

It's a rare project of mine that does not have a Ranger product on it.  The product I use most often is definitely Distress Ink, but I think my absolute favorite is Alcohol Ink. I LOVE the AI colors, especially the brights!  Sail Boat Blue AI is my kind of blue! What's your favorite Ranger product?

Wednesday, June 2, 2010

For Aunt Mary

My Aunt Mary's 90th birthday is coming up later in the month and my cousin, Eileen, is having a small party for her.  Eileen asked the guests to create an 8 x 8 pages for a memory book. Here's my contribution. . .


The barn, silo and tractor are some old PSX stickers I had.  The background is Distress Ink.  The tree trunk is stamped with Hero Art's "Designer Wood Grain" stamp using Distress Ink. 

The lower left is lacking something and I was going to ask you for ideas, but as I type this, I realized I did not really leave any room on the tree to sign it.  I think I will "scratch" Happy Birthday and sign our names in the area on the left.  Whaddya think?


Roasted fish?

or bunny or lamb or flower or  . . . whatever you want!

I was checking out blogs earlier and stopped by one of my favorite stops, Eileen's ArtSavesLives blog  (not my cousin mentioned in the previous post but someone I met on the Voyage to Mexico cruise with Tim Holtz).  She always has awesome projects and links not to mention a great sense of humor.   I had to do a double take when I saw her fabulous 4 x 4 canvas! (scroll down on Eileen's blog to see the canvas) I saw something that looked really familiar. . . the fish!  It is one I created sometime last year for a swap on the All Things Tim yahoo group!!!    

I used one of my fishies on my August calendar page

I told Eileen I would give the instructions on how to make that little guy (or anything else you want)!   First the disclaimer, if you try this at home (or any other place), do so at your own risk.

Now for the fun stuff!

The supplies you need are:
 * cut-out - can be any shape or size, can be free-hand or diecut.  As far as size I did not have much success with really small stuff (under an inch or so) or really big stuff (over 3-4 inches). I have used grungepaper, heavy brown grocery bags and cardstock.  I like grungepaper the best.  It is sturdier than the other papers I've used and it shrinks when it gets hot which I think adds to the overall look. 
 *Aleene's Tacky Glue - gold bottle (this is the only glue I have tried, so I don't know if anything else would work)
 * matches
 *container of water (just in case, I use a small glass bowl so not only do I have it "just in case" but I can put the used  matches in it and not worry)
 *candle - short pillar worked best for me
 * needle-nose pliers or other "holding device" you don't mind getting sooty (fingers will definitely not work for this one, lol)
 *cloth rags
 * sponges (I used $tree make-up sponges cut in half)
 * Acrylic paint - colors depend on what you are making

Step 1 - Light the candle
Step 2 - Spread the glue over the entire surface, there needs to be enough glue so you can't see the paper underneath it.
Step 3 - While glue is wet, pick up shape with pliers and hold glue surface as close to the flame as you can  (the non-glue side should be facing the ceiling)  moving slowly around until entirely burnt - about 2 minutes - give or take. 
Step 4 - Using a soft cloth rag, gently wipe off soot.  If it is done, it will be kind of a  metallic black under the soot.  If it is too "rare", it will look brownish.  If rare, return to flame for  another 20-30 seconds and re-test for doneness.
Step 5 - Once all the soot is wiped off, you can apply a little more pressure and squish the glue around (the outside is burnt, the inside is still wet) to give the object more texture.
Step 6 - This is the hardest part of all - once you have given it texture walk away from it and let it dry completely (I usually let the stuff sit for a day or two)
Step 7 - Use sponges to add color in layers.

Here are some more calendar pages and other critters I made -  


Some other notes - 

- The sunflower is the biggest object I made and was difficult to get all parts burned because of the uneven weight of the glue and trying to hold it with needlenose pliers.  Depending on the intended purpose, there is an alternative way of making the objects, especially big ones - before Step 1 you can glue a heavy piece of wire (18-22 gauge) or two between two cutouts, then proceed with Step 1.  After you completed the first side, you could glue/burn the second side and then have a totally dimenisional piece of art that can be used as a "sculpture".

- If you use to little glue and/or apply too much pressure you get a flatter surface as in my Jack-o-lantern above.

- In my examples the fish and Jack-o-lantern were made using grungepaper; the bunny, lamb, leaves and sunflower were all made with cardstock. 


If you have questions you can either leave a comment or send me an e-mail (link is in the side-bar).   


Edit:  6/3/10 9:55 p.m.

Just to clarify - "Roasted fish" is not my original idea (however, the title is my original idea! lol)- I discovered the technique in a  booklet I found at a thirft store called "Creative Living Book #99-207 - Aleene's Burnt Brown Grocery Bag" copyrighted 1991.