

Be sure to check out my fellow guest designer, Alison Hall's awesome project too!
If you LOVE all things Tim and you haven't already, be sure to check out the All Things Tim Yahoo Group! It's a great place to ask questions, find inspiration and see fabulous projects in the picture gallery!
The idea behind Grungy Monday is to create something using a Tim Holtz technique as "assigned" by Linda at StudioL3 using supplies from your stash, NOT spending a fortune trying to get everything, unless of course, you have an extra fortune laying around. So with that and thinking it was a good time to start making Christmas gifts in mind, I began my adventure in creating my "guest designer" project!
Challenge 12 involves going to Tim's April 2008 Technique Challenge. Step 1, hmmmmm I don't have the paper he used, but I have tons of paper and decided on my favorite piece from Tim's Lost & Found Paper Stash. Next step, harlequin stamp? Shocking as it may sound, I don't have it. (OK Chris, get up off the floor from your shock, lol!) I have some background stamps, but not with the lots of "negative" space. After some pondering some or maybe it was after hearing the pop-pop-pop of bubble wrap in a co-worker's cube, it hit me! Use a piece of "large bubble" bubble wrap. With the major hurdles behind me, I was on my way.
I used a 6 x 12 canvas as my base. I embossed and painted the paper before adhering it to the canvas.

I really like how the bubble wrap worked as a stamp. This was the first time I tried this technique, think I will try it again. I followed Tim's instructions until I got to the part about using "Crackle Accents". Again something I don't have, but I did have some Rock Candy Distress Crackle Paint and used that on the butterflies.

I added a few more finishing touches and ta da -
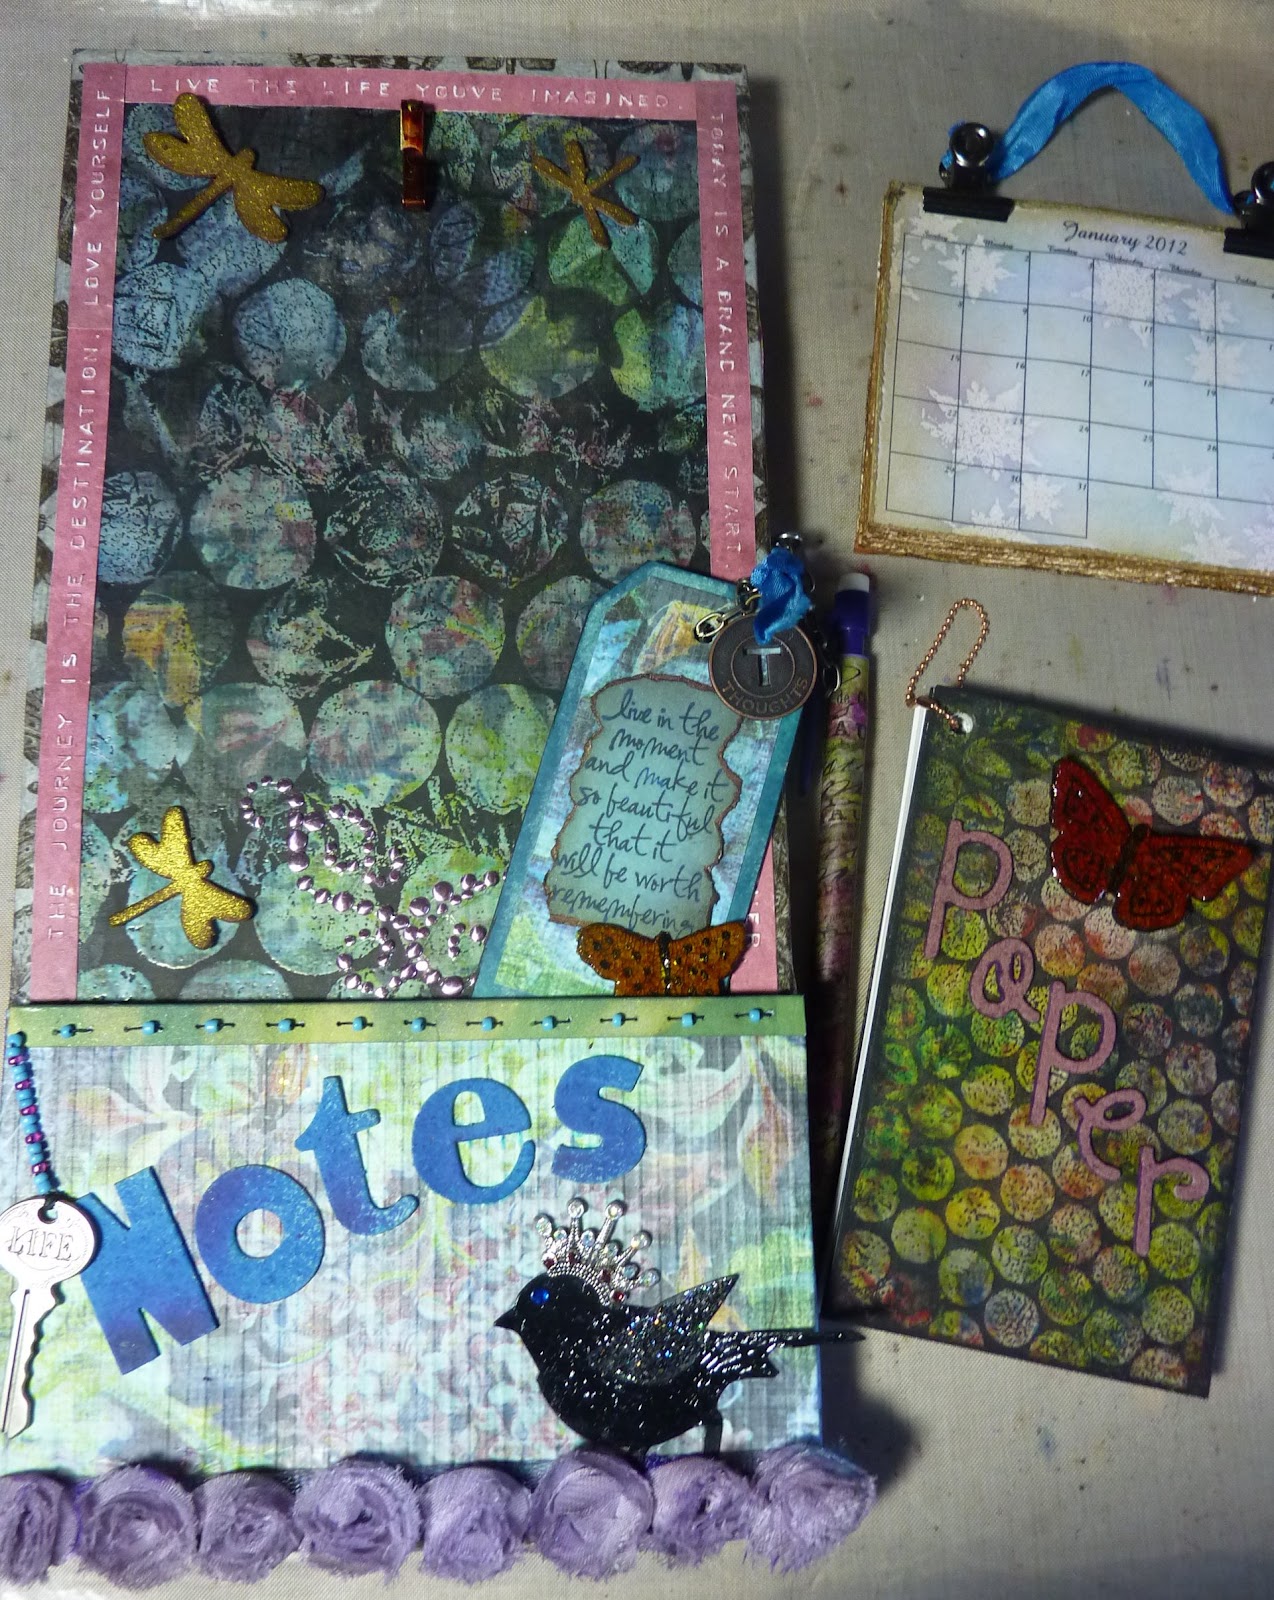
It even comes with options of what to hang from it. . . .
the calendar (see my Grungy Monday 11 post)

OR
a note "pad"

The note pad was creating using the challenge technique too. Here's a close up

I used tissue tape that I inked with Alcohol Inks around the edges of the canvas and had a piece left over , so I "altered" a mechanical pencil.


Thanks for stopping by! I hope you enjoyed your visit and will be back soon! And thank you again Linda for having me as a guest designer and a BIG thank you to TIM for all the inspiration he continually gives us!
Have a fabulous week!
Linda
Products used:
6 x12 canvas
repurposed bubble wrap
RANGER INK
Pitch Black paint dabber
Stickles
Icicile
Burgundy
Waterfall
Black Diamond
Distress Ink
Chipped Sapphire
Stormy Sky
Wild Honey
Brushed Corduroy
Walnut Stain
Rusty Hinge
Black Soot
Clear Embossing
Perfect Pearls
Heirloom Gold
Sunflower
Blue Patina
Alcohol Ink
Wild Plum
Cranberry
Stonewash
Lettuce
Distress Stain
Faded Jeans
Broken China
Glossy Accents
Craft Mat
Studio Mat Medium
Blending tools
Lost & Found paper stash
Grungeboard
Nature pack
Plain sheet
Tissue Tape
Hinge Clip
Word Key
Philosophy Tag
Lavish Trim
Link Chain
Hero Arts clear embossing powder
Sizzix
Alteration die -Caged bird
Doodle Block Alphabet
Prima - Say it with Studs
Miscellaneous stuff from my stash
Crown
beads
gem
screw eye
picture hook
bubble wrap
staple gun
Great to be a GD along with you Linda! Your piece is awesome! I love how you stamped with bubble wrap, I'll definitely be trying that!
ReplyDeleteAlison xx
This looks great! Love all the possibilities here... I know I've got bubble wrap on hand. BTW, that pencil is a really nice touch! Congrats on your GM guest spot.
ReplyDeleteCongratulations for being part of our inspiration this week! Those are some amazing projects! The butterfly is a gorgeous embellishment! Love these!
ReplyDeleteINCREDIBLE!!!!!!!!!!!!! Is there no end to your imagination?????? I LOVE it! And you are inspiring others....... how AWESOME!
ReplyDeleteWowee! Great job making do with what you have on hand with an awesome end project!
ReplyDeleteWow. I mean, really, really WOW!
ReplyDeleteVery beautiful creation, and what a wonderful concept for gift-giving times!
Thanks for explaining all of the steps you took!
Fabulous use of the technique, Linda, and congrats on being a guest designer!
ReplyDeleteOh wow so loving all your pieces Linda and congratulations on being GD for the other lovely Linda. Annette x
ReplyDeleteWow, that's such a faszinating and inspiring piece.
ReplyDeleteWhat an awesome project!! Love the use of bubble wrap as a stamp - I thought it was a rubber stamp until I read your post. Very, very cool!
ReplyDeleteThis is so cool.. Just love how you used Tim's technique.. Congrats on your GD spot..
ReplyDeleteThe details on this are fantastic. You did a smashing job with this technique.
ReplyDeleteSuch a fabulous project and creation. Great post full of know-how and tips! Well done on being a GM designer 0 you did an amazing job!!!
ReplyDeleteSarah