Showing posts with label Studio L3. Show all posts

Thursday, July 12, 2012

A Compendium of Curiosities, Vol 2 - challenges 11 and 12

Whew!  Just under the wire with a not quite finished project for the challenge presented by the wonderful Linda at Studio L3!  Linda's challenge lasted 2 weeks, only I didn't see it until Monday (the 9th)!  Instructions for the challenge were to turn to pages 33 & 34 in Tim Holtz' "A Compendium of Curiosities, Vol 2".  


Like I said, it's not quite finished so I will be back in the next week or so with a finished box!

Sunday, June 17, 2012

Better late than never

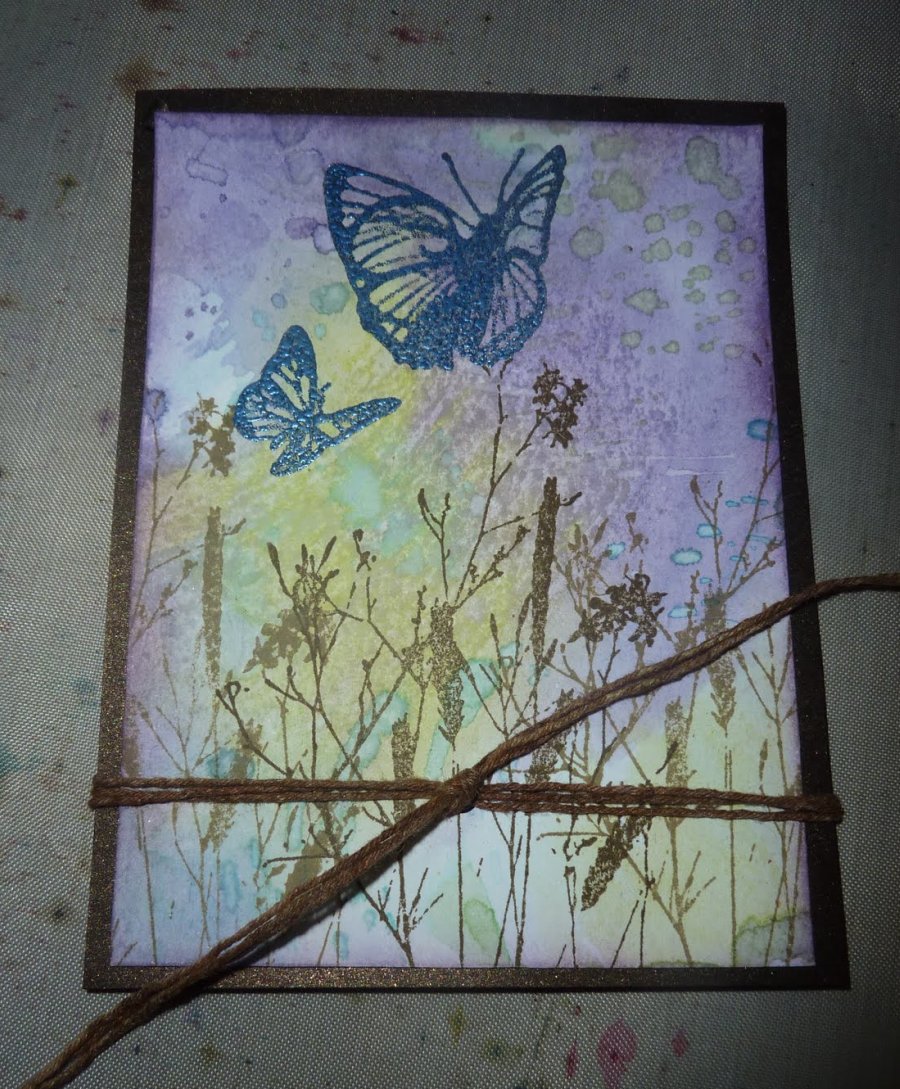
Last week over at Studio L3 was Challenge 9 from the Compendium of Curiosity, volume 2.  The challenge had us turning to page 35 of Tim Holtz' awesome book.

I finished my card too late to add to the challenge but I did finish it! I made it for my sister-in-law's 60th birthday, which we celebrated Friday night.  She loved the card!

The butterfly background started as a napkin!


I am off to go try Challenge 10! If you want to play, drop by Linda's StudioL3 blog for all the details and find out about the prize!

Have a great week!

Sunday, August 14, 2011

GM #19

Here's my entry for Studio L3's Grungy Monday #19 Challenge.  Our inspiration/instructions came from Tim's 12 tags of Christmas. . . day 10 (2010).

The bird and branch are on top of the cracked window, the cage under it.

Have a great week.

Linda

Products used:
Ranger Ink:  Manilla cardstock, Snow Cap & Copper Dabbers, Broken China, Faded Jeans, Dusty Concord, Forest Moss and Black Soot Distress Inks, Coffee and Jet Black Archival ink, Glossy Accents.

Sizzix - Mover & Shapers Mini Bird & Cage Set

Misc - scraps of grungeboard, scraps green & brown cardstocks.

Sunday, August 7, 2011

Grungy Monday #18

For Grungy Monday 18 Linda at Studio L3 had us go to Tim's 12 Tags of Christmas...{day 8} 2009!

Here is my creation!


The bird is from the "Nature" grunge pack - I used Black Soot Distress Ink then covered it with Ranger's Holographic embossing powder!  This is the coolest embossing powder ever, it changes colors depending on how much you heat it!  (I heated the center a bit more than the edges)  On the branch I used Walnut Stain Distress Ink with Vintage Photo Distress Powder.  See below for the other products used.


Have a fabulous week and be sure to check the StudioL3 blog for Challenge 19 after Monday, August 8!


Linda


Other products used:
Card base - Stardust "Fairway" cover stock,
Mat - Ranger's manilla card stock
Distress Ink
   - Tumbled Glass
   - Black Soot
   - Walnut Stain
   - Old Paper
   - Vintage Photo
   - Forest Moss
   - Bundled Sage
   - Peeled Paint
Sentiment stamp - Clear Art Stamps - "Bird Lovers" set
Leaf  Stamp  - Great Impressions
Birds stamp - Visual Artistry - Lost & Found set
Ranger Archival  Jet Black ink
Vellum - from my scrap bin
Craft Esstentials black embossing powder

Sunday, July 24, 2011

GM #16 Grungeboard (or Grungepaper) Extravaganza

This week StudioL3's challenge for Grungy Monday was to create something using Grungepaper or Grungeboard as the predominate element in a project.  We could use any technique we wanted.  If you need inspiration or instructions a fabulous place to go is to the King of Grunge . . . Tim Holtz' blog where you will find scores of ideas.  There are links to his archives on his left sidebar and a link to video demos on the right sidebar.

I decided (finally) on making a post-it note holder along with a grunge rose. . .


Last week (GM 15) I only got as far as creating what turned out to be a background for the challenge.  I am happy to say I completed the piece and it is now residing at its new home.

My chiropractor has this AWESOME machine, which has some name I can never remember because I always call it "Thumper".  They always laugh when I ask if I get Thumper.  Now everyone is going to call it Thumper because I made a sign to hang on it!


I found a digital coloring page for Thumper and paper pieced it together, all 25 pieces!   This the AWESOME machine with it's name tag and the FABULOUS Theresa!


Hope you have a great week!

Linda

Products used on Post-it holder:


Grungepaper
Distress Ink: Peeled Paint, Broken China, Faded Jeans, Rusty Hinge, Barn Door, Forest Moss
Alterations Ticket die
Stamper Anonymous - Tim Holtz Odds & Ends stamps
Staz-on Jet Black Ink
Post-it Notes
Miscellaneous Bling


Products used on Thumper
all the paper was from my scrap piles
Sizzix Tree die for the bushes
Maya Road mini alphabets
Misc flowers
sticklesPublish Post

Sunday, July 17, 2011

Under the weather and the wire (GM 15)

Earlier in the week I finished the background pieces for GM 15 over at Studio L3!  I checked out Tim's blog, followed the direction and created these:


Unfortunately, that is as far as I got this week. . . check back soon for a completed project!

Saturday, July 2, 2011

A weekend of FUN!

Hi!

Why a weekend of fun?  Because I get to stay in the AC and PLAY!!!

Studio L3's Grungy Monday Challenge 13 is to play with one of my very favorite-ist (I know, I just created a new word! lol) Ranger product - Alcohol Inks!!!   This week's instructions had us going to Ranger Ink to watch a video with Tim Holtz demoing the use of Alcohol Inks!  

Here's a card I made for the challenge:


This card along with a lot of others I have created will be heading off to Operation Write Home.  They in turn will ship it (along with a bunch of others) to our troops stationed overseas so they can send cards home to their families and friends.

Speaking for OWH, they are having a virtual card making party on their Stars and Stamps blog, right NOW!   Every 2 hours today and tomorrow (Saturday and Sunday), there is a different blog hosting the party.  Each blog has a challenge and some have blog candy!   OWH will also pick a random winner from ALL entries at the end of  July!  

I will be the hostess at 1 p.m. tomorrow (Sunday) and I WILL have blog candy to give away!  Hope you come back and play!

Have a fun and safe weekend!

Linda

Products used: 

Ranger Inks Alcohol Inks: Purple Twilight, Sailboat Blue, Raspberry, Butterscotch, Citrus, and a few other greens a (the list I was keeping disappeared)
Memory Box "Whimsy Circle" die
2 clear gem stickers (dyed with Citrus Alcohol Ink)
Hero Arts Clear Designs A (adore)
White glossy card stock
Black glossy card stock

Monday, June 20, 2011

Grungy Monday 12

WOW! It is Monday and I have the current challenge posted.  Well, I guess it helped that the awesome Linda at StudioL3 asked me to be a guest designer this week!  So I HAD to have my project done and posted!  Thank you Linda for the honor of being a guest designer!

Be sure to check out my fellow guest designer, Alison Hall's awesome project too!

If you LOVE all things Tim and you haven't already, be sure to check out the All Things Tim Yahoo Group!  It's a great place to ask questions, find inspiration and see fabulous projects in the picture gallery!

The idea behind Grungy Monday is to create something using a Tim Holtz technique as "assigned" by Linda at StudioL3 using supplies from your stash, NOT spending a fortune trying to get everything, unless of course, you have an extra fortune laying around.  So with that and thinking it was a good time to start making Christmas gifts in mind, I began my adventure in creating my "guest designer" project!

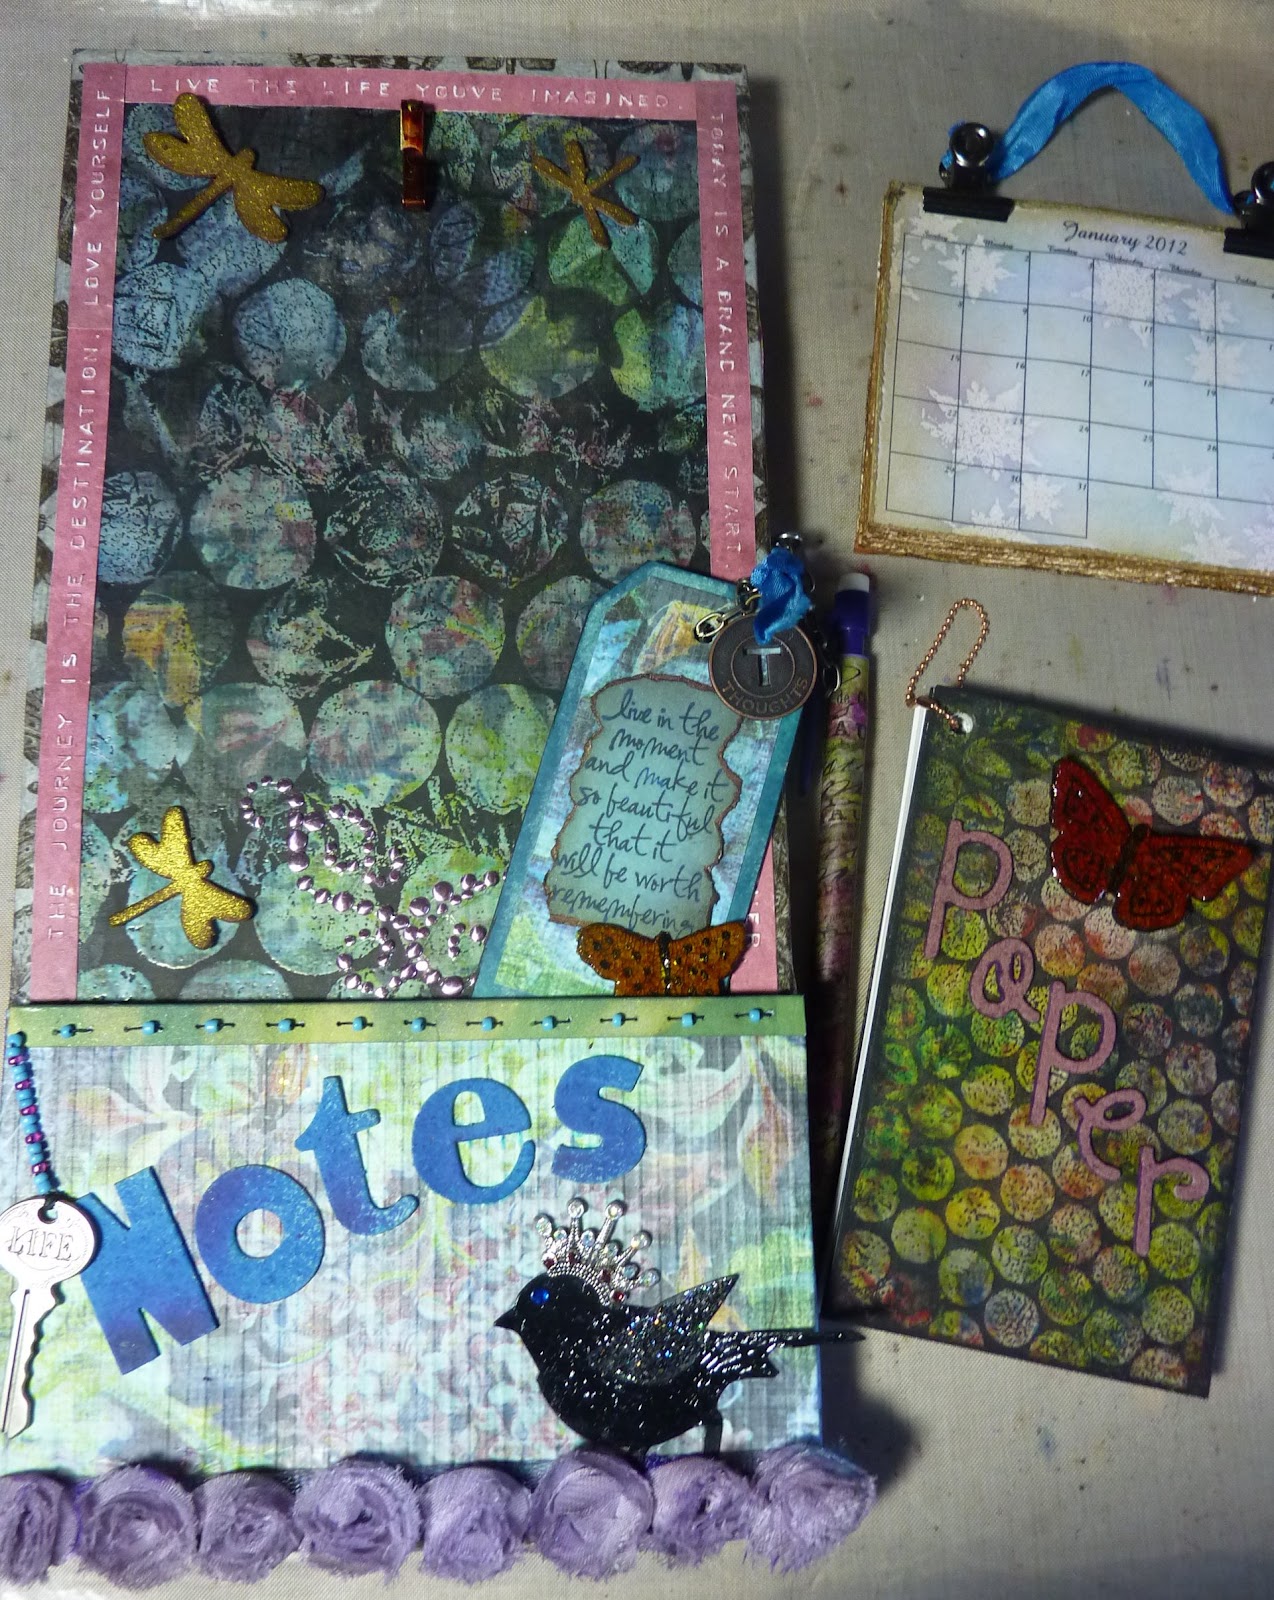
Challenge 12 involves going to Tim's April 2008 Technique Challenge.   Step 1, hmmmmm I don't have the paper he used, but I have tons of paper and decided on my favorite piece from Tim's Lost & Found Paper Stash. Next step, harlequin stamp?  Shocking as it may sound, I don't have it. (OK Chris, get up off the floor from your shock, lol!)  I have some background stamps, but not with the lots of "negative" space.   After some pondering some or maybe it was after hearing the pop-pop-pop of bubble wrap in a co-worker's cube, it hit me!  Use a piece of "large bubble" bubble wrap.  With the major hurdles behind me, I was on my way.

I used a 6 x 12 canvas as my base.  I embossed and painted the paper before adhering it to the canvas.

I really like how the bubble wrap worked as a stamp.  This was the first time I tried this technique, think I will try it again. I followed Tim's instructions until I got to the part about using "Crackle Accents".  Again something I don't have, but I did have some Rock Candy Distress Crackle Paint and used that on the butterflies.


I added a few more finishing touches and ta da -


It even comes with options of what to hang from it. . . .

the calendar (see my Grungy Monday 11 post

OR 

a note "pad"

The note pad was creating using the challenge technique too.  Here's a close up


 I used tissue tape that I inked with Alcohol Inks around the edges of the canvas and had a piece left over , so I "altered" a mechanical pencil.


Thanks for stopping by!  I hope you enjoyed your visit and will be back soon!   And thank you again Linda for having me as a guest designer and a BIG thank you to TIM for all the inspiration he continually gives us!

 Have a fabulous week!

Linda

Products used:
6 x12 canvas
repurposed bubble wrap
RANGER INK
Pitch Black paint dabber

Stickles
   Icicile
   Burgundy
   Waterfall
   Black Diamond


Distress Ink
   Chipped Sapphire
   Stormy Sky
   Wild Honey
   Brushed Corduroy
   Walnut Stain
   Rusty Hinge
   Black Soot
   Clear Embossing
Perfect Pearls
    Heirloom Gold
    Sunflower
    Blue Patina
Alcohol Ink
   Wild Plum
   Cranberry
   Stonewash
   Lettuce
Distress Stain 
   Faded Jeans
   Broken China
Glossy Accents
Craft Mat
Studio Mat Medium
Blending tools


Lost & Found paper stash
Grungeboard 
   Nature pack
   Plain sheet

Tissue Tape
Hinge Clip
Word Key
Philosophy Tag
Lavish Trim
Link Chain
Hero Arts clear embossing powder

Sizzix 
   Alteration die -Caged bird
   Doodle Block Alphabet
Prima - Say it with Studs
Miscellaneous stuff from my stash
Crown
beads
gem
screw eye
picture hook
bubble wrap
staple gun


Sunday, June 12, 2011

Grungy Monday #10 with a "Nellie Knot" tutorial

On Monday when I went to Linda's Studio L3 to learn what the latest challenge was, I found that was simply "Distress Ink".  Now don't get me wrong, "simply" does NOT describe Distress Ink as there are multitudes of ways to use it and looks to get, in fact Distress Ink is my "go to" ink unless I need a waterproof ink.  Our challenge was to create something using Distress Ink any way we wanted!  Oh what fun this will be!

Tuesday evening I was a bit stressed, so I did something that "de-stresses" me.  I "Smooshed"!  Smooshed? What is "Smooshing" you ask?  Perhaps you know it better by what Tim (Holtz) calls it, "Wrinkle Free Distress"!  You can find the directions for Smooshing, I mean, Wrinkle Free Distress on page 33 of Tim's book A Compendium of Curiosities.

I used every color of DI (not all on one sheet) and created 10 sheets of background paper!  I had great fun and felt much better after I finished!

I used part of one of the background pieces for this card:


A while back I took a class at Stamper's Corner (Elk Grove, CA) where Nellie taught us a nifty trick for bows/knots on our cards.  What is nifty is the bow/knot will stay exactly where you put it!   With her permission, here is how to make a Nellie Knot.


1) Decide where you want your bow or knot.

2) Punch a hole in the chosen spot. (Note: If the card is vertical like mine, then just put a hole in the top layers before you adhere it to the card.  If the card is horizontal, then you can adhere the layers, then punch the hole  the layers and card.)


3) Cut a piece of fiber 2 1/2 to 3 times as long as the width of the direction the fiber will go.

4) Fold fiber in half.

5) Push fiber from front to back through hole.


6) Put ends on either side of hole and loop the fiber from the back over to the front (making sure there are no unwanted twists in the fiber).


7) Tie the bow or knot!


8) Voila!  A bow or not that won't move or fall off!  Pretty nifty, huh?


Hope you enjoyed the tutorial!

Be sure to check out Linda's (Ledbetter) blog on Monday morning for Grungy Monday 11!

Have a fabulous week!

Linda

Products used to create:  Craft sheet, White Diamond paper (from Stampers' Corner), Distress ink (Broken China, Tumbled Glass, Dusty Concord, Peeled Paint, Frayed Burlap, Walnut Stain, Vintage Photo), Art Glitter Mist (copper), Ace Hardware multi-purpose twine, Idea-ology Muse Token, Tim Holtz "Odds & Ends" and "Nature's Discovery" stamps, Ranger Ink Pearl Blue embossing powder.

Thursday, June 2, 2011

Grungy Monday #9

HI!

The challenge Linda over at StudioL3 chose for this week is from the technique Tim showed us on Tag 10 during the 12 Tags of Christmas 2007!   Hop on over to Tim's blog for the directions to try this fun and easy technique.

 
When I saw what the technique was,  I knew exactly what I was going to do!  By the time I got to the studio, though I had changed my mind and made this instead:


I used Black Pitch, Snowcap, Aqua,  Stream and Copper dabbers, Shell stamps from Hero Arts' Antique Engravings set, letters are cut from grungeboard using Sizzix Doodle Block die on my Vagabond, swivel clasp, miscellaneous charms, adage ticket, mini paper clips, sea glass (with a light coat of glossy accents over the top to make them look wet and shiny), Ranger clear embossing powder, a random shell and miscellaneous fiber.

Did you see what  I mentioned? Did you catch "vagabond"?  I am so excited, I just got my birthday present (my birthday was a couple weeks ago)!  A brand new beautiful awesome so much fun to play with gift!   The first time  I played with it was last night and I didn't want to stop. lol

Can you tell I was just a little excited?


Hope you are having a fabulous week!  Stay safe.
Linda

Sunday, May 29, 2011

Grungy Monday #8

It's Grungy Monday # 8 over at Linda Ledbetter's StudioL3 blog and almost time for #9!  If you haven't checked Linda's blog out, you really need too!  (The GM link will take you directly to the challenge; the Studio L3 link will take you to the home page.)

I almost didn't have anything for Grungy Monday #8, not because I didn't try, but because it just wasn't working for me.  I tried on Monday evening and I tried on Wednesday.  I was either getting puddles or I was getting no blending. (Yeah, I know too much water or not enough).  But after going through 5 or 6 sheets of paper, I had had enough. It could have been because we are having weird weather for our part of California, nothing like some of you have been experiencing, but none the less, let the barometric pressure change and I get migraines.

I decided to give it one last try today.  At least that was my excuse to take a break from the cleaning! lol   So what was the challenge that was so challenging for me?  To get directions and find inspiration we were sent to Tim's September 2008 challenge

Perhaps it wasn't the migraines that were the problem afterall, perhaps it was the "substituting" I did.  I didn't have the Adirondack Dye Pads or watercolor paper.  I used Distress Inks (in Barn Door, Mustard Seed, Peeled Paint and Bundled Sage) and Diamond White paper (it's some really great paper from Stampers' Corner).   The stamp is Hero Arts, the ribbon is from my stash as is  the background paper.

Persistence paid off!


Hope you have a fabulous week! 

Linda

PS - As I mentioned, I am cleaning (my studio) and if you are interested in an envelope full of scrap paper - anywhere from 1" x 6"  up to 8.5 x 11, let me know and I will send an envelope stuffed full.  If more than one person is interested I will either divide it up or have a drawing or something but my scrap bin runneth over so some has to leave.  Leave a way for me to contact you too, please.

Sunday, May 15, 2011

A busy weekend!

I've been on a roll this weekend, actually all week!  Saturday was the deadline for getting items entered in the State Fair delivered.  I made it to the fair grounds with 22 minutes to spare. (And I was NOT the last person arriving either! lol)  Judging is Wednesday and then sometime before June 2, entrants find out what didn't make it.  (We have to pick up the items not receiving a ribbon on June 2 or June 3  or have the fair people mail the stuff on June 2.)   Once I know what made it and what didn't I will share pictures.

I was in creative high gear all week, then kicked it up a notch on Friday and Saturday.  I guess the juices are still flowing today as I have been busy creating most of this cool, rainy day!

Grungy Monday Challenge 6 (GM)(hosted by the fabulous Linda at Studio L3)  is based on Tim Holtz' 12 Tags of Christmas 2007, Day 8.   If you haven't checked out the challenges, you really need to as they are great fun!

Over at Gingersnap Creations' blog the Random Redhead Challenge that ends today is "Fans".  Gingersnap creations is another awesome challenge site, if you haven't checked them out, it's another place you need to go!

I decided to combine the challenges!  WHAT? How do you combine GM with fans?????  Well I created the background using GM's technique:


The piece on the left is being "saved", I have an idea floating around to use it in my canvas I started with Grungy Monday challenges 1-5.  The piece on the right is what I used for the background of Gingersnap's challenge.  (When I took this picture I wasn't quite finished with the GM as you are supposed to stamp an image on it, which I did eventually as you will see!)

I created some fan using washi paper and Tim's Sizzix rosette die.  I used the tiny attacher to hold the fans together, then wrapped some cord around the staple and volia! I had this card!  (Ok, I added a little glue and tape too, but you know what I mean! lol)


Since the base of the card is an Onyx (black) I created a second background piece to use as a liner inside the card:

Hope you enjoyed your visit!  Please take a moment and leave a comment, I'd love to hear from you!  Have fabulous week and don't forget to check out Studio L3 tomorrow for Grungy Monday challenge 7!

Linda


Supplies used for this card are:  Onyx (black) Stardream folding card, Inkssentials Manila Cardstock (LOVE that stuff!), Adirondack Aqua Dabber, Chipped Sapphire Distress Ink, Simply Sage Delta Paint for Paper, Hanko Designs Washi paper, Great Impression #e320 (leaves),  Kodomo Ink "Sayings  1", Studio Matte Medium and Miracle Tape.

Friday, May 6, 2011

Playing catch-up

What do you get when life is a whirlwind?  Behind!  My life certainly has been a whirlwind lately, but it is finally settling down!  I have been so busy (or sick)  that until this last week I did not even have time to play along with the Grungy Monday challenges and they are already on Challenge 5!  But never fear, it is time to play catch up!

What is Grungy Monday you ask?  Well head on over to StudioL3 to find out!  (The link will take to the "introduction" for Grungy Monday!)

The first challenge started back on March 28 and it used the techniques the AWESOME Tim Holtz used on the 2008 Day 10 Tag for the 12 Tags of Christmas!  The idea of Grungy Monday is to take a "Tim Technique" and put your personal twist on it.  Here is my twist!


 The second challenge took participants to the Ranger Ink website to view a Tim Holtz video demonstrating Distress Ink with Studio Matte Medium!  I never tried this technique before, it was quite fun!  It was kinda like magic because I was sure it wasn't going to come out, but I kept applying the ink and my ship magically appeared!  I think I got it right - the speakers are not hooked up to my computer, so I watched in silent mode, lol!


The third challenge explored using Tim Holtz Adirondack Color Wash!  Another product I had never used before!  All I can say is WOW! oh, and make sure everything around is well protected! lol


The fourth challenge took participates to  the "timholtz" YouTube channel for a lesson on Texture Fades and Distress!


And finally, the fifth challenge takes us to a New Dimension!  You can read all about it on Tim's blog.  This is the current challenge and it is open until 8:00 p.m. (MT) on Sunday, May 8, 2011.  Then on Monday, the fabulous Linda will post challenge 6!


So what do you get when you put 5 challenges together?  A work in progress!  I plan to incorporate a few more of the challenges into my canvas, so nothing is permanently attached yet.  I will let you know when it is complete!


Hope you have a fabulous weekend and in case I don't post again before Mother's Day. - Happy Mother's Day!

Sunday, March 6, 2011

Can't imagine why, can you?

On Tuesday evening, I worked on CCC 34!  I left it on my work table to dry.  Since Tuesday I've worked on other stuff, mostly wedding stuff (as I write this we are down to 3 weeks and 5 days!  How does time slip away so quickly?).   The studio is also becoming my greenhouse for the wedding since I am trying to create an enchanted jungle.  Then I happened to drop by  a store that had some plants on sale for half price that I had to get.

Today (Sunday) I realized I had not posted yet, partly because I was not happy with the way my fragment came out and partly I've been busy with other stuff.  It wasn't the directions on page 63  of A Compendium of Curiosities for Dimensional Collage Fragment technique because as all of the instructions in book they are very clear and nicely illustrated.  The problem was my execution of the technique.  The reason I wasn't too happy with it was because the flower I used got under another element and you can't tell it's a flower.   Even though I don't care for it much I was going to show it to you anyway along with some I made a couple of years ago when Tim was in town.  So I went to my studio to get the fragment and I couldn't find it.  I did look,  but it was nowhere to be found.  I am sure when I clean (no Chris, I did not get as far as cleaning the studio yesterday! lol) I will find it so I can add it to my journal I making for all the challenges.  


Do you see it sitting on the table?
Can't imagine why I can't find the fragment, can you?

The flowers (Cyclamens) are my latest purchase, well except for the ferns I bought today, but they are still in the van and are going to live in the office until the wedding.   Directly behind the chair is this view:

Like I said, the studio is turning into a greenhouse!  There are more plants outside  plus a friend has a nursery and he is going to loan some "background" plants for the wedding.  An then there is the friend at work who is going to be doing some landscaping and will let me use his plants before he puts them in the ground!  I am also working on one of the stores to see if I can rent a 6' waterfall!

OK back to the Dimensional Collage Fragment.  I found the ones I made for the project with Tim. (Perhaps "found" is not the right verb as it is on display in the studio!)  This started as a plain framed IKEA mirror!  There are 6 dimensional collage  fragments in this project - one in each of the lower corners, one above the center of the mirror and one on each the left & right upper edge of the mirror.  There is another one on the bottom right edge of the mirror.  The key in the fragment  to the upper left of the mirror started as a flat metal key, but as time has gone by, it reacted with something and turned turquoise!  It was quite interesting watching it change as it started at one end and slowly went to the other.


Hope you have a fabulous week!

Linda

Sunday, February 13, 2011

CCC #31

Boy,  working full time and planning a wedding sure doesn't leave one much time for other activities! For the 31st Compendium of Curiosities Challenge hosted by the fabulous Linda @ StudioL3, I decided to design an element to use at the reception!  (There is more than one way to have some fun!)

We are going to have a limited open bar (beer, wine and a "signature drink") with a twist!  As at most bars there will be a tip jar, the twist will be the tips will be for the bride & groom! (If you want a twist of lime with your drink, we might have those too! lol)  Anyway, I have a big jar that I plan to decorate with the same elephants used on the invitations with a jungle background.  Going up the jar will be different locations of where the kids "will" go on their honeymoon depending on the tips they make.

Anyway, here are the elephants, they were made as one piece.  Hard to tell they are enameled and they don't have eyes yet, but I will get there.  I didn't get as far as I planned as one of my sisters dropped by for a surprise visit and then I spent a lot more time than I had planned planting or re-planting some "tropical" plants I got at a fabulous price (yes, for the wedding!)

 (sorry about the weird angle, but I scanned it instead taking a picture and that is the only way I could get the elephants to fit on the scanner.)

Once I get the jar completed I will try to remember to take pictures and post.

I hope you have a fabulous week!

Linda

Sunday, January 23, 2011

Challenge 28 from "A Compendium of Curiosity"

Hi!  This week Challenge 28 from A Compendium of Curiosity challenge over at StudioL3 was found on page 57, Colorful Layered Fragments.   Unlike some of the more recent challenges I actually started working on it on Monday, the day the challenge was posted!  Go me!

I created 2 pieces, the smaller one (the fish) for my sample book and the large one (butterfly) for a "TBD" later project.


Turns out late Thursday night (as in I was already in bed and about to fall asleep) I realized I had not made my friend (and boss), SJ, a card for her birthday which was Friday.  So the "TBD" later project took shape.   Friday morning I quickly threw some elements together including the large fragment with the butterfly.  In my rush to get things done before I left for work, I didn't even think about taking a picture of the completed card.


Thanks to my friends  we are making great strides on the wedding invites!  Teresita came over yesterday (Saturday) and helped embossing elephants on the invitations, inking the edges and started to assemble the mats.  SJ came over today (Sunday) and we finished assembling the invitation mats & invite.  We worked on the bands that will go around the entire "packet".   My goal is to have them in the mail by February 1 and  I think we will make it with time to spare, well if I get all the addresses the goal will be met!  In case any of you are wondering why the bride isn't working on the invitations it's because she is in the Air Force Reserves and is away at training until the end of February.   And her bride's maids are scattered from Maryland to Hawaii and Los Angeles to Seattle, so with the help of my AWESOME, FABULOUS, and WONDERFUL friends we are getting the invitations done.

What kind of paper cutter do you use?  What do you like about it?  Is there anything you don't like about it?

Hope you have a fantastic week!

Linda

Sunday, January 2, 2011

Once again under the wire - CCC #25

Once again I am making just under the wire. . .

Here's my entry for Compendium of Curiosities Challenge 25 going on at StudioL3.  Instructions can be found on page 34 of the Compendium of Curiosities! 


Same technique, different paper and what a difference it made!!


Hope 2011 has started out fabulous for you!


Edit -Thankfully everything came together!  From the time I realized tonight was the deadline for Challenge 25 to the time I created the 2 "pieces" and finished posting - 24 minutes!  Good thing I work well under pressure!  And THANK YOU LINDA (LEDBETTER) for having a quick and easy challenge this time!

Friday, November 12, 2010

I am not LAST this week or CCC challenge 21!

As the title implies, I am not (at least I hope I am not) the last one to post an entry for the 21st Compendium of Curiosities Challenge over at Studio L3!!!  I am excited as it seems lately, I have just been squeaking in before the deadline!  You have until Sunday evening (November 14) to get something posted! So if haven't checked out (the other) Linda's blog, you really need to get over there and check it out.

This week, I admit I had ahead start. . . I had the background paper already made. . .not because I knew what the challenge was going to be, but because I am working on "Save the Date" cards for my youngest daughter's wedding!  As long I am admitting things, not ALL the cards will have the "Perfect Distress" technique applied, in fact only a few, if any, will make it to the mail.

Here are 2 of the 50 or so backgrounds I had already made using the "smooshing" technique. 

 
Here's where I used the challenge's technique which can be found on page 38 of the Compendium of Curiosities.
The next few pictures are the almost final prototype I made to get the bride & groom's approval. . . .and it is not very pretty, a slip of a stamp is not a good thing, but it gave them a good idea of what the cards will look like. The prototype was also a learning exercise for me!  The most important lesson - emboss before attaching the elephants. lol

You can see the results of the Perfect Distress just above the elephant on the left.  And another important lesson - do not use too much "wet glue" (in this case Studio Matte Meduim) on the elephants.


This is the "almost final" prototype because the insert with all the details is on the computer waiting to get over it's virus. (Along with all the addresses to mail). The insert will be printed on the same blue as the heart between the elephants and mounted on the darker blue inside. I need to make a slight design change as Kristine has requested the heart only have K + R.


I will spend most of the weekend getting the cards put together as much as possible, finishing a wedding album for a co-worker, making a few miscellaneous cards and getting ready for Rebecca (my daughter who lives in Hawaii) to come home on Tuesday and Erinn & Kristine will be here Thursday night!!!  I am excited all 4 kids will be home and we get to celebrate Thanksgiving together on the 20th!   What are your plans for the weekend?

Hope your weekend is fabulous!

Linda

PS - If you were one of the winners from my drawing on Halloween, I haven't forgotten you, it just seems like I blink a days have flown by.  I apologize for the delay and will get your prizes out to you soon!

PSS  - A special thank you to my awesome son, Joseph, who has been uploading pictures for me so I can get them posted!