As I was blog hopping, I ran across a blog that had a request for help (another besides your's Lori! lol). And me being the shy person that I am, I left a comment with a tip about using a damp rag to wipe Distress Ink off embossed images and a note saying I had more tips if she was interested. She was interested and responded requesting more tips. I created a little tutorial for 3 backgrounds using distress ink and thought I'd share here too. The differences in techniques are what I did before I stamped the image.
The base for all images is cream cardstock. The image itself is from Tim Holtz' "Traveling Friends" set from Stampers Ananymous and was stamped with Jet Black Stazon. I used Tim Holtz’ Distress Inks in Faded Jeans (FJ), Peeled Paint (PP), Antique Linen (AL), Old Paper (OP), Vintage Photo (VP) and Black Soot (BS)
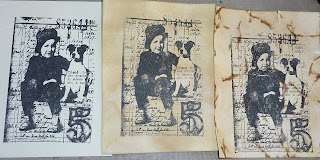
The 3 options I show are: 1) do nothing before adding image; 2) add some background color before adding image [on this version I misted the ink with water and dried with a heat tool but the one below I did not add the water], and; 3) adding some background color with "texture". Here are the 3 backgrounds with images only. (please note, these 3 are not the ones I used with the colors below because I created these after I finished the others. While I was previewing my blog entry it dawned on me, that perhaps I should have taken "before" pictures as well as the "after" pictures. lol)
This first image is stamp directly on the cardstock without any color added before I stamped. After stamping I added FJ & PP.
This second image I used AL & OP before I stamped the image, then I added FJ & PP. Just some subtle differences but are really noticable in the child's face and the dog.
The third image I used AL & OP, crumpled the paper up a couple of times, (when I say crumpled, I really crumpled the paper)
then I dragged VP over the peaks, misted the paper, ironed the wrinkles out (I use a paper towel between the image and iron because some of the color will come off), then stamped the image and added FJ & PP
Here is the card I made using the last image. I tore the image and inked the edges with VP and decided it wasn't quite dark enough so I added some BS. The "Journey" was embossed using Tim's embossing ink and black embossing powder on the same cream cardstock as the main image. While adding color to the embossed image, I grabbed the black blending tool instead of the brown one so there is a bit of BS along with FJ, PP and OP.
Please let me know what you think! If you have any questions I will try to answer them! Take care,
Linda


Nice tute! Great instructions and pics. Sheesh, someone out there needs help besides me? Love the finished card, very cool. Ahh,did you keep the paper towel you ironed on? Just curious. lol Seriously, can you believe what a difference a couple of little steps make?
ReplyDeleteThanks for the tutorial, Linda! Add me to the HELP PLEASE! category ;)
ReplyDelete