Monday, December 27, 2010

Inspired by the 12 Tags of Christmas

Did you have a FANTASTIC Christmas?  I hope so!
To all my friends who sent Christmas cards, THANK YOU.  Each and every one is awesome!

In some respects mine was fabulous. . .I had my grandkids here!  (Technically they are not my grandkids yet because the wedding is not until April, but they have stolen my heart already so they ARE my grandkids!)   They are such sweethearts!  In other ways it has been a hard few days as this it the first Christmas without Mom.  Having Brandon and Izzy here definitely helped me though!

Izzy

Brandon


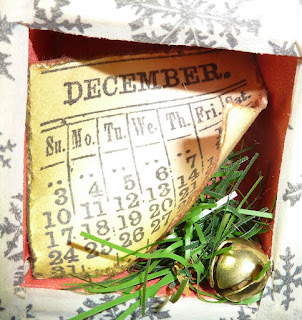
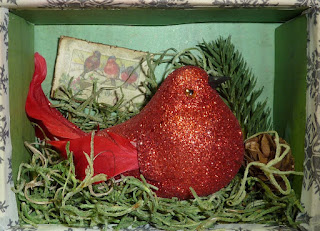
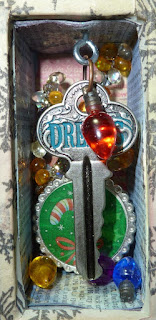
It's always a busy time of year but I managed to follow along while Tim was creating his 12 Tags of Christmas.  I even created about half them, but somewhere in the early days of the 12 tags I was inspired to create a shadow box using Tim's "Configurations"!  The box is why I don't have all the tags completed yet because I was making boxes!  I really had fun with this!

Some of the compartments were created using the technique introduced in the 12 Tags, other compartments were designed around the images used in the tags. Thank you Tim for the inspiration (and for designing the cool products!)
Day 11

Day 6

Day 12

Day 5

Day 8

Day 3

Day 9


Please let me know if you have questions about any of the boxes, and I will try to answer them for you.  


Products used (most if not all the products came from my stash, some of which has been waiting for a long while! lol):
Ranger:
Distress Inks, Studio Matte Medium, Sticky Back Canvas, Embossing Powders, Rock Candy Stickles, Paint Dabbers, Alcohol Ink, Distress Embossing Ink

Idea-Ology
TH Seasonal Paper Stash, TH Vintage Shabby Paper Stash, Configurations, Grungepaper, Grunge board, Word Keys, Facets, Adage Tickets, Baubles

Sizzix
Reindeer Flight die, texture fade

Miscellaneous products
Hot Off The Press papers
Christmas House Holly Bush
Celebrate it Christmas pine bough
DecoArt Glistening SnowTex Glittering Snow
jewel
eye hooks
K & Co - Tim Coffey Metal Tags
Dress It Up "Tree Trimmers"
Hero Arts Embossing Powder
Pocket Change by Heidi Grace Designs
Mrs. Grossman's "stuffed stickers"


Monday, December 20, 2010

Early December


December started out with a bang for me!  On the first Saturday of December, SJ came over for an "impromptu" Scrappin' Saturday!  I am slowly "dragging" her into the "Tim World"! lol  We made Days 3 & 4 tags from Tim Holtz' 12 Tags of Christmas.

SJ's Day 3
SJ's Day 4

    
Linda's Day 3
Linda's Day


(note as of 12/20 I have a few other tags completed, just haven't taken pictures yet.  As soon as I get pictures I will post along with the "big" project!  We keep the house "cool" in the winter (around 64 degrees F) and it takes FOREVER for stuff to dry, so while I am a bit closer to being finished I am still waiting for stuff to dry before I can move on to the next step!)

The First Sunday in December means it's Gingerbread House Day at Aunt Linda's!  On the Friday and/or Saturday before I bake a gingerbread houses or trains (from scratch) for each "little" guest.   The house smells so yummy on those days.

The third annual event was a little different, instead of making houses just for the kids, I made houses for their moms too!! Last year my great-nieces, Savannah and Erica, were not too happy with the "help" offered by their moms (my nieces Marie & Debbie).  Marie and Debbie did an admirable job of trying not to help too much, but I could see their fingers itching to "help".   So this year everyone had their own house!  

Soooo many choices!  

Getting started

Erica and Savannah with their creations
Debbie and Marie with their houses!

A close up of Savannah's
A close up of Erica's
A close up of Marie's

A close up of Debbie's


Didn't they all make AWESOME houses?  

In case you are wondering where mine is, I don't make myself a house on Gingerbread Day, I just sit back and watch the fun (and make sure icing is available, candy bowls are filled, take pictures and help as needed!).  Totally LOVE the afternoon!   Sometimes I make a house (or train) for Christmas Eve dinner if we are bringing the desserts.

If you are going to be in the neighborhood next year on the first Sunday in December and want to drop by, let me know and I will have a house ready for you too!


Sunday, December 19, 2010

In case you are wonderin' (and CCC# 24)

I haven't forgotten how to blog. Really, I haven't!  I have been busy; besides getting ready for Christmas, I decided an unexpected root canal would be fun.  It was my first ever and I was kidding about the fun part because this last week had not been fun.

I have managed to get a few things finished including Compendium of Curiosities Challenge #24 hosted by the fabulous Linda at StudioL3!  Today is the last day of the challenge, but there will be a brand new challenge posted tomorrow morning, so be sure to check it!

For Challenge 24 we were instructed to turn to page 47 for the Rock Candy Distress Stickles technique.  Check out the  Compendium of Curiosities  by Tim Holtz for the details on the technique.  For the base of my tag, I found a couple pieces of scrap paper that had obviously had been used to make Christmas trees at some point and used the leftover "frame".  Under the trees I used some leftover TH Seasonal Paper Stash. (I LOVE using all the little leftover pieces of paper I can't throw away!)  Once I had the tag base created, I followed the directions in the book!  It's a fun easy way to add some sparkle!  If you haven't already, I hope you give it a try! 


Did you follow along with Tim and his 12 Tags of Christmas?  The man is a creative GENIUS.  Even though I haven't posted any yet, I have 6 days completed, 2 days in progress and 4 waitin' to get made plus another project.  I hope to have the project completed by tomorrow and the tags before Christmas.  As soon as they are complete, I will post pictures!


Have a fabulous week!


Linda


Products used:
tag
TH Seasonal Paper Stash
Vintage holly garland
Rock Candy Distress Stickles
Burgundy Stickles
Archival Ink - jet black
Ofray ribbon

Sunday, December 5, 2010

Queen of Last Minute, part 2

The other challenge that I wanted to create something for and also ends tonight (Sunday) is GingersnapsCreations GS78 Spicy Supply Challenge: Sewing Notions.   


I used Tim Holtz' Configurations for the base.  If you haven't played with one yet, you really need too!  I am HOOKED.  Don't be surprised if you see more configurations on my blog!


I started this project shortly after the challenge was announced.  I just finished it because I wanted a sewing machine and found one on eBay.  When I got it, it wasn't quite as big as I wanted. I have been pondering every since on what to include with it. There's a hanger in there now (even though it's hard to see), but I'm not sure if I am satisfied.  Any ideas or suggestions?


Years ago my aunt gave me a box of old sewing notions that I had no idea what to do with it, but I couldn't get rid of it.  From that box of goodness I used the pincushion (I applied a coat of Studio Matte Medium because the covering is so thin from use and age.)  I also used part of an old tape measure I found in the box.  


Other items such as the snaps, zipper pulls, thimble and bobbin came from the "nuts & bolts" cabinet I claimed after my mom passed away.


This is a close up of the cover on plain background so it's a little easier to see. The stamp is from Wendy Vecchi's Fashion Style and Art stamp set.


The flowers are some I made  when Tim (Holtz) Tattered Floral die came out. They are in a vintage wooden spool.  The pattern in the background is a reduced photocopy.  The lace if from my mom's stash.

I have a few other configurations either started or planned!  They are loads of fun and I hope you will be able to play with some SOON!

Thanks for stopping by and taking a look!  Have a fabulous week!  

Linda


Queen of Last Minute, part 1

So Linda at Studio L3 gave us 2 WEEKS to finish the 23rd Compendium of Curiosity Challenge and here I am minutes before the deadline finishing my project and posting. . . .  


Without further ado, here is my entry!


Take care,
Linda

Thursday, November 25, 2010


Thank you for being my friend!

Have safe, happy and blessed Thanskgiving!

Sunday, November 21, 2010

Splatter! Edited (edits in red)

Hi!  Did you have a fabulous weekend?  I sure did!  We celebrated Thanksgiving a bit early as ALL four of my kids were home this weekend!  It was the first time in what seems like forever that we have all been together!  We had a house full of family and friends yesterday - about 26 people in all!  It was glorious, everyone had a fantastic time!


I am running a bit behind (what else is new) on  A Compendium of Curiosities Challenge 22 so I am having another mad dash to post before the deadlines.   Good thing I work well under pressure! lol  Details about the challenge and prize can be found on the fabulous Linda Ledbetter's StudioL3 blog.  She has a new challenge every Monday!  This week we were told to turn page 52 for Alcohol Ink Splatter!


I started with some acetate (recycled from an old report cover) (so much for following directions), using a negative mask I spray painted the image with black paint on the acetate, after the paint dried I applied the technique of the week directly to the acetate and over the black paint, added some embellishments and was done!


Have a fabulous week!


Linda


Wednesday, November 17, 2010

Holiday Workshop Projects and Typeset Tutorial

On November 6 & 7 I was fortunate enough to take Tim (Holtz) Holiday Workshop classes here in Elk Grove!  We created three fabulous projects including a "Seasonal Memoirs" (holiday journal) (forgot to take a picture),

"Festive Creative Blocks" (canvas wall hanging)


and my favorite "Configurations of Your Imagination" (Configuration Shadow Box). 


One of the tricks we learned was how to make faux "type set blocks".  Did you realize the ones in my box were not "real" blocks?  They are super easy to make and here in my own words are what you do!
Supplies needed: Extra thick chipboard/cardboard (grungeboard could be used, but to "save" gb, Tim had us use chipboard), grungeboard letters, black Dabber (paint), distress ink, blending tool,  Studio Matte Medium (or other "glue"), sanding block (not pictured)


1) Using the Matte Medium glue grungeboard letter to chipboard, leaving a small space between the edge and the letter, trim chipboard so there is space between the letter and edge on all 4 sides.  (Trim before moving to the next step otherwise the block will be too thick to cut.)


2) Glue the chipboard with the grungeboard letter onto another piece of chipboard, aligning the edges. Trim as necessary so all the edges are even.


3) Once glue is dry, gently sand edges to blend seams. Wipe dust off.  (The left block has not been sanded in the picture below)


4) Paint black.    (Sorry, no picture here, but I think you can figure out this step!  Then again, you can probably figure out all the steps without pictures.   lol)


5) After paint dries, sand edges of chipboard to expose. Sand top of grungeboard letter to expose bits of the grungeboard. (Don't sand too much paint off, you want it looking distressed) Wipe dust off.

EDITED NOTE:  If you use chipboard letters/numbers when you sand be gentle as chipboard letters may disintegrate with sanding.

6) Apply ink with blending tool. I used vintage photo, resanded some and added aged mahogany.

There you have it, easy to make faux type set blocks!  If you want "real" type set blocks you have to glue the letters on backwards, so when the block "prints" on paper, the letter is right side up!

If you give this a try, please let me know how it worked for you!

In the next week or so, I will be stocking my Etsy store with items, including charms, ephemera, the "Festive Creative Blocks and "Configurations of Your Imagination" (Configuration Shadow Box) shown above.  I will let you know when I get the store stocked and hope you will drop by!

Take care,
Linda

Friday, November 12, 2010

I am not LAST this week or CCC challenge 21!

As the title implies, I am not (at least I hope I am not) the last one to post an entry for the 21st Compendium of Curiosities Challenge over at Studio L3!!!  I am excited as it seems lately, I have just been squeaking in before the deadline!  You have until Sunday evening (November 14) to get something posted! So if haven't checked out (the other) Linda's blog, you really need to get over there and check it out.

This week, I admit I had ahead start. . . I had the background paper already made. . .not because I knew what the challenge was going to be, but because I am working on "Save the Date" cards for my youngest daughter's wedding!  As long I am admitting things, not ALL the cards will have the "Perfect Distress" technique applied, in fact only a few, if any, will make it to the mail.

Here are 2 of the 50 or so backgrounds I had already made using the "smooshing" technique. 

 
Here's where I used the challenge's technique which can be found on page 38 of the Compendium of Curiosities.
The next few pictures are the almost final prototype I made to get the bride & groom's approval. . . .and it is not very pretty, a slip of a stamp is not a good thing, but it gave them a good idea of what the cards will look like. The prototype was also a learning exercise for me!  The most important lesson - emboss before attaching the elephants. lol

You can see the results of the Perfect Distress just above the elephant on the left.  And another important lesson - do not use too much "wet glue" (in this case Studio Matte Meduim) on the elephants.


This is the "almost final" prototype because the insert with all the details is on the computer waiting to get over it's virus. (Along with all the addresses to mail). The insert will be printed on the same blue as the heart between the elephants and mounted on the darker blue inside. I need to make a slight design change as Kristine has requested the heart only have K + R.


I will spend most of the weekend getting the cards put together as much as possible, finishing a wedding album for a co-worker, making a few miscellaneous cards and getting ready for Rebecca (my daughter who lives in Hawaii) to come home on Tuesday and Erinn & Kristine will be here Thursday night!!!  I am excited all 4 kids will be home and we get to celebrate Thanksgiving together on the 20th!   What are your plans for the weekend?

Hope your weekend is fabulous!

Linda

PS - If you were one of the winners from my drawing on Halloween, I haven't forgotten you, it just seems like I blink a days have flown by.  I apologize for the delay and will get your prizes out to you soon!

PSS  - A special thank you to my awesome son, Joseph, who has been uploading pictures for me so I can get them posted!